
[HPC From Scratch] Episode 2: RAM, NVMe, and the iGPU Memory Trap
Published:
Four nodes. 16GB each. One hidden BIOS setting that can crash your Slurm jobs.
Welcome back to HPC From Scratch. In Episode 1, we covered the full cluster architecture, cost breakdown, and network layout. This episode focuses on the compute backbone: upgrading the four Lenovo ThinkCentre M715q nodes with dual-channel RAM and NVMe storage, and fixing a BIOS setting that silently eats your memory.
(Click the image to watch the tutorial on YouTube)
Table of Contents
- 1. What We Are Working With
- 2. The Storage Upgrade Path
- 3. RAM Upgrade: 8GB to 16GB Dual-Channel
- 4. The iGPU Memory Trap
- 5. Upgrade Cost Summary
- 6. What is Next
> 1. What We Are Working With
Each M715q is a tiny Micro Form Factor PC. Here is what they shipped with from eBay:
| Spec | Stock Configuration |
|---|---|
| CPU | AMD Ryzen 5 Pro 2400GE (4C/8T, 35W TDP) |
| RAM | 8GB DDR4 SO-DIMM (single stick, single-channel) |
| Boot Drive | 240GB 2.5” SATA SSD |
| M.2 Slot | Empty (NVMe capable) |
| iGPU | AMD Radeon RX Vega 11 |
The Ryzen 5 Pro 2400GE is a 35-watt part. Quiet and low-power, which matters when you have four of them sitting on your desk. 4 cores and 8 threads per node gives us 32 threads total across all the M715q nodes.
The stock 8GB of single-channel RAM is not enough for most HPC workloads. And the fact that the boot drive was a 2.5” SATA SSD turned out to be a good option for the storage upgrade.
> 2. The Storage Upgrade Path
When I opened the first M715q, I found the 240GB SATA SSD sitting in the 2.5” bay and an empty M.2 NVMe slot on the motherboard.
Because the OS boots from the SATA port, the high-speed M.2 slot is free. I realized that I could install a 1TB Samsung 990 Pro into that slot on the management node. This drive serves as the NFS storage for the entire cluster.
If the boot drive had been an M.2 SSD instead (which I believe is a default option for these units), the upgrade path would have been different. I would have bought a standard SATA SSD for NFS instead. You work with the hardware you get.
A PCIe Gen 4 NVMe drive is probably overkill for a Gigabit Ethernet network. Even more so because the M715q’s M.2 slot is PCIe 3.0, so the 990 Pro runs at Gen 3 speeds anyway. The network will bottleneck long before the drive does. We will benchmark the throughput we actually get in a later episode.
Note: Only the management node gets the NVMe drive. The other three M715q nodes keep their stock 240GB SATA SSDs as boot drives. There is no need for local fast storage on compute nodes when jobs read data from NFS.
> 3. RAM Upgrade: 8GB to 16GB Dual-Channel
8GB may not be enough for data processing on HPC. The upgrade strategy was simple: add a second stick instead of replacing the existing one with a single 16+ GB RAM.
Each M715q came with one 8GB DDR4 SO-DIMM in one slot which leaves the second slot empty. I bought matching 8GB sticks and installed them in the empty slots. This gives us two benefits:
- Double the capacity (8GB to 16GB)
- Dual-channel memory bandwidth
Dual-channel matters for compute. With a single stick, the CPU accesses memory through one channel. With two sticks in both slots, it can read and write through two channels simultaneously. This roughly doubles the theoretical memory bandwidth, which directly affects performance in memory-bound workloads like MPI and numerical computation.
RAM Compatibility
The M715q uses DDR4 SO-DIMM (laptop-sized) memory. When buying used RAM, match the specifications as closely as possible to the existing stick:
| Spec | What to Match |
|---|---|
| Form Factor | DDR4 SO-DIMM |
| Capacity | 8GB (to match existing stick) |
| Speed | DDR4-2666 or higher (the 2400GE supports up to 2933) |
| Voltage | 1.2V (standard DDR4) |
(M715q I purchased came with DDR4-2666)
I bought my RAM sticks on eBay. The four sticks cost a total of $78, averaging about $20 per node for the upgrade. If you buy 16GB kits (2x8GB) new, expect to pay more, but compatibility is guaranteed.
Tip: If you are unsure about compatibility, check the spec sheet online. Search for the matching part online.
Installation
Opening the M715q is straightforward. Remove one screw on the back panel, slide the top cover off, and the internals are fully exposed. Once you remove the 2.5” SATA bay (one screw, then slide forward), the two SO-DIMM slots are clearly visible. Push the new stick into the empty slot until the clips snap into place.
I upgraded all four nodes. The management node took a bit longer because it also got the Samsung 990 Pro NVMe drive. The other three were just RAM, so I ran through them quickly.
> 4. The iGPU Memory Trap
This is the part that might save you hours of debugging later.
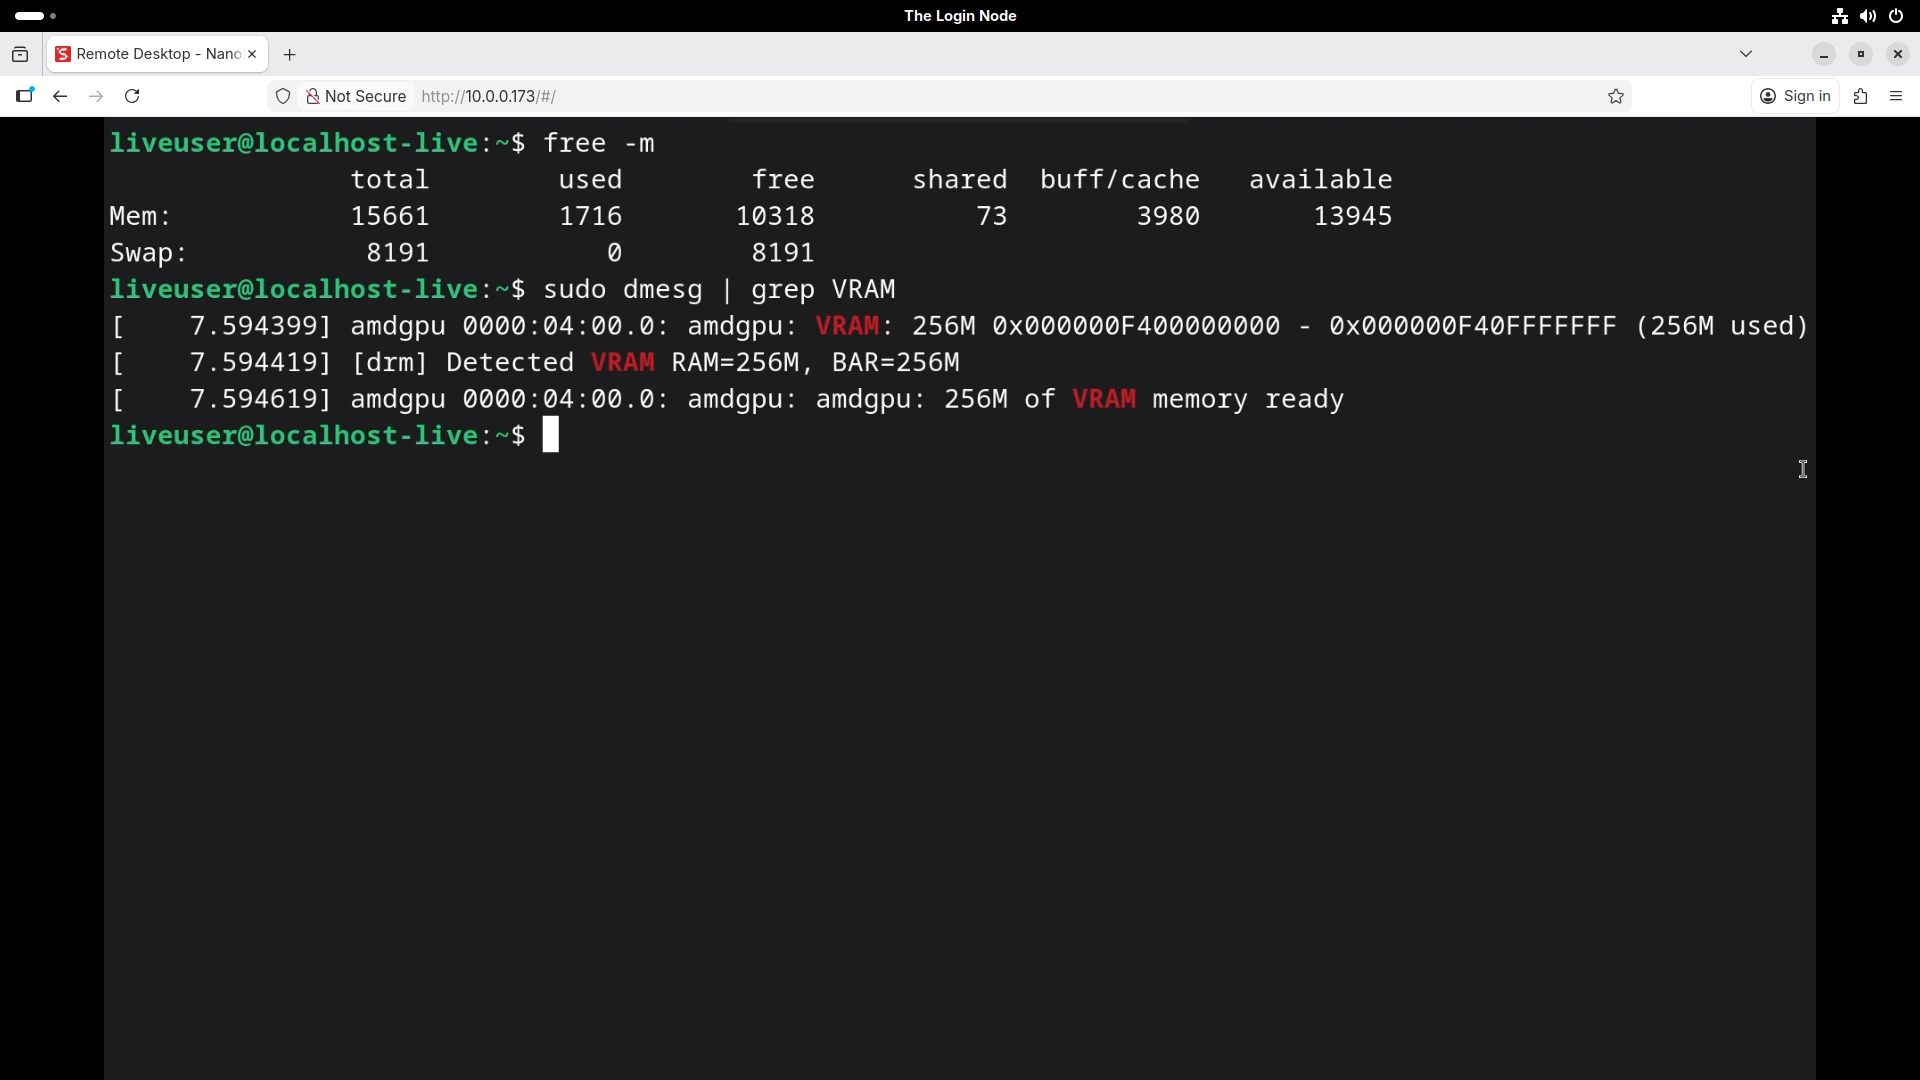
After installing the RAM, I booted the management node into a Linux Live USB using the NanoKVM (no monitor or keyboard needed). I opened a terminal and ran:
$ free -m
              total        used        free      shared  buff/cache   available
Mem:          15661        1656       10369          73        3989       14005
15,661 MiB. We installed 16GiB (16,384 MiB). Where did the other ~700 MiB go?
The answer: the integrated Vega GPU. Ryzen APUs share system RAM with the iGPU (integrated GPU). The GPU reserves a portion of your physical memory as video memory (VRAM), and the operating system never sees it.
I confirmed this with following command:
$ dmesg | grep VRAM
The output showed 256MB allocated to VRAM.
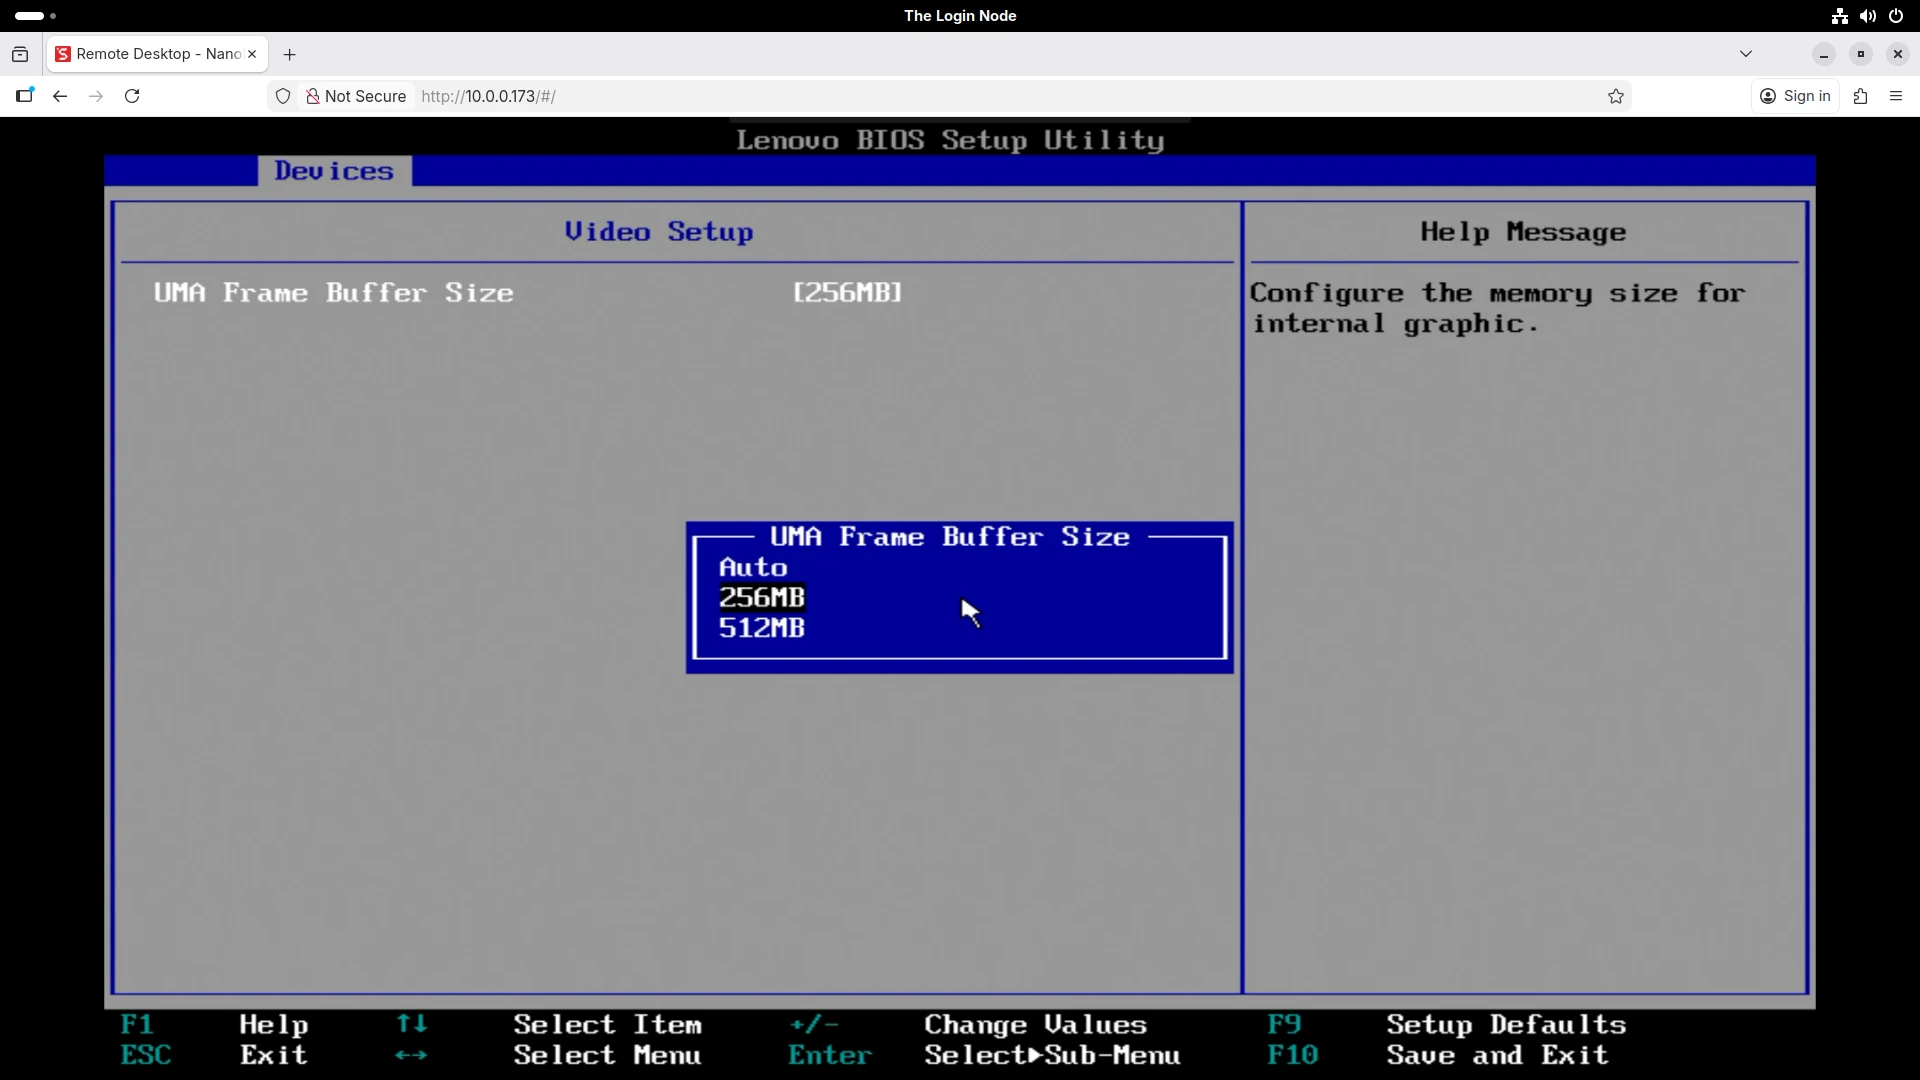
BIOS Setting: UMA Frame Buffer Size
The amount of RAM reserved for the iGPU is controlled by a BIOS setting called UMA Frame Buffer Size. On my units, the default was set to Auto, which allocated 256MB.
I explicitly set it to 256MB (the lowest available option). Why bother changing it if Auto was already picking 256MB? Because Auto let the firmware decide, and that decision could change after a BIOS update or a hardware configuration change. If the iGPU suddenly grabs 512MB instead of 256MB, your Slurm jobs could start failing and the error messages will not point you to the BIOS.
Pinning it to a fixed value removes that variable.
Why This Matters for Slurm
When you configure Slurm later in this series, each node’s memory must be declared in slurm.conf using the RealMemory parameter. If you set RealMemory=16000 because you installed 16GB, Slurm will try to allocate memory that does not exist. Jobs will crash with out-of-memory errors.
The correct approach:
- Boot the node
- Run
free -mand note thetotalvalue - Use that number (or slightly below it) as
RealMemoryin your Slurm configuration
# Example slurm.conf entry
NodeName=interceptor-01 CPUs=8 RealMemory=15600 State=UNKNOWN
Every megabyte counts. Document it now, and save yourself the debugging later.
> 5. Upgrade Cost Summary
Here is what this episode’s upgrades cost:
| Item | Count | Unit Price (USD) | Total (USD) |
|---|---|---|---|
| DDR4 8GB SO-DIMM (Micron) | 2 | 15.00 | 30.00 |
| DDR4 8GB SO-DIMM (Hynix) | 2 | 24.00 | 48.00 |
| Samsung 990 Pro 1TB NVMe | 1 | 109.90 | 109.90 |
| Episode Total | $187.90 |
Combined with the four M715q units from Episode 1 ($343.60), the total compute backbone cost so far is $531.50. That covers four Ryzen nodes with 16GB dual-channel RAM each and 1TB of NVMe storage for NFS.
Per node (excluding the shared NFS drive): roughly $105 for a fully upgraded Ryzen 4C/8T compute node with 16GB of RAM.
> 6. What is Next
The compute backbone is assembled and verified. But hardware without a network is just a pile of metal.
In Episode 3, we will look at the rest of the cluster: the HP Envy TE01 GPU node with its Intel i7-10700F, the Gigabit network switch that connects everything, and why the login node uses WiFi to bridge the cluster to the internet.
Happy Computing!