
[HPC From Scratch] Episode 3: The WiFi Login Node
Published:
A laptop, a home router, and a gigabit switch. One isolated cluster subnet.
Welcome back to HPC From Scratch. In Episode 2, we upgraded the four M715q nodes with dual-channel RAM and an NVMe drive, and fixed the iGPU memory trap that can crash Slurm jobs. This episode covers how the cluster comes online: the network topology, the decision to put the login node on WiFi, and the software that makes a laptop behave like a cluster gateway.
(Click the image to watch the tutorial on YouTube)
Table of Contents
- 1. The Topology Decision
- 2. Login Node on WiFi
- 3. DHCP and NAT on the Login Node
- 4. Hardening the Exposed Surface
- 5. Why WiFi Is Not the Bottleneck
- 6. What is Next
> 1. The Topology Decision
In production HPC, management and compute networks are strictly wired, physically separated, and connected through managed switches with VLANs. That costs real money. A single enterprise managed switch can run more than this entire cluster.
For a home cluster, there are two realistic paths:
- Flat home network. Plug every node into the home router. Easy, but every node is exposed to the same network as phones, TVs, and IoT devices. No isolation.
- Physical isolation with a dedicated switch. All cluster nodes live on their own subnet behind a cheap unmanaged switch. The login node bridges the two worlds.
I went with option 2. The Netgear GS308E ($21.50, new) provides the isolation. The login node sits at the boundary, doing DHCP, DNS, and NAT for the internal cluster subnet. Worker nodes never see the home network directly.

The result is the same pattern used in production HPC: the login node at the edge, an internal fabric behind it, and no direct external exposure for compute nodes. The difference is scale. Gigabit Ethernet instead of InfiniBand. An unmanaged consumer switch instead of a spine-leaf topology. Same architecture, different order of magnitude.
Note: The HP Envy GPU node (
corsair-01) also connects to the same switch and gets the same base OS and network setup as every other node. The GPU side of that box will be configured in a later episode.
> 2. Login Node on WiFi
The login node is carrier, a refurbished Lenovo IdeaPad 1 ($161). It has WiFi and one Ethernet port. Most build guides would tell you that a login node should be wired. I put this one on WiFi on purpose.
Why WiFi for the external side? The login node needs internet access for package updates, pulling datasets, and remote SSH from outside the home. Running Ethernet to the home router would work, but it would also consume one of the switch ports I need for cluster nodes, and it would require an extra cable across the room. WiFi removes that constraint at the cost of bandwidth that the login node does not actually need.
Why Ethernet for the internal side? All heavy traffic (NFS reads, MPI messages, scheduler heartbeats) has to stay on the wired switch at full gigabit. The login node’s Ethernet port is the gateway into that fabric.
There is one practical problem with using a laptop as an always-on gateway: if the lid closes, systemd-logind suspends the machine and the cluster loses its DHCP server, DNS, and NAT. The fix is a one-line change in /usr/lib/systemd/logind.conf:
HandleLidSwitch=ignore
After a systemctl restart systemd-logind, the laptop can live closed on top of the cluster stack without suspending.
The other setup piece is routing priority. With two interfaces active, the login node needs to send internet-bound traffic over WiFi, not try to push it through the wired cluster subnet. Lower route metrics win in Linux routing, so setting the WiFi metric lower than the Ethernet one makes WiFi the default route:
nmcli connection modify <WIFI> ipv4.route-metric 10
Full command sequences are in the GitHub repository.
> 3. DHCP and NAT on the Login Node
The worker nodes have no route to the home router. They need IP addresses from somewhere, and they need a way out to the internet for dnf updates. Both services run on the login node.
DHCP via dnsmasq. I picked dnsmasq over isc-dhcp-server because it is lightweight, single-binary, and handles both DHCP and DNS. For a six-node cluster, anything more is overkill. The config is about ten lines: specify the interface, set a DHCP pool (192.168.50.10-50), advertise the login node itself as the gateway, and hand out public DNS servers to the workers.
NAT via firewalld masquerade. The workers have private IPs (192.168.50.x) that cannot be routed on the public internet. The login node rewrites the source address on outbound packets to its own WiFi IP, sends them out, and routes the return traffic back to the right worker. Two pieces are needed:
- Kernel-level IP forwarding, enabled with
net.ipv4.ip_forward=1insysctl. - A masquerade rule on firewalld:
firewall-cmd --permanent --add-masquerade.
Once both are in place, I power on a worker node, check /var/lib/dnsmasq/dnsmasq.leases on the login node to find its assigned IP, SSH in, and run ping 1.1.1.1. If the ping works, NAT is working.
Tip: Keep
log-dhcpon indnsmasq.confduring initial bring-up. Watchingjournalctl -u dnsmasq -fwhile a worker boots tells you exactly when the lease is offered and whether the worker picks it up. Turn logging off once things are stable.
After every worker is online, I set hostnames (arbiter, interceptor-01, interceptor-02, observer, corsair-01) and drop them into /etc/hosts on the login node. From now on, ssh arbiter works instead of ssh 192.168.50.10. A later episode replaces this with FreeIPA-backed DNS.
> 4. Hardening the Exposed Surface
Only the login node is reachable from the home WiFi. The workers sit behind NAT on their own subnet, so nothing on the home network can reach them directly. That means hardening effort goes into carrier, not the others.
Three things matter here: SSH config, brute-force protection, and a small systemd fix specific to laptops.
SSH drop-in config. Rocky 9’s /etc/ssh/sshd_config already includes files from /etc/ssh/sshd_config.d/*.conf, so customization is a single short file in that directory instead of a full copy of the main config. The only real change I make is disabling direct root login:
PermitRootLogin no
Everything else stays at upstream defaults. Public key authentication is already enabled by default, so ssh-copy-id from the login node to each worker just works. Password authentication also stays on: HPC environments typically allow password login alongside keys because users coming from university clusters expect it, and FreeIPA integration in a later episode will route that through centralized auth anyway.
fail2ban. Brute-force attempts on port 22 happen even on home networks. A compromised IoT device on the same WiFi is enough to start one. fail2ban watches auth logs and temporarily bans IPs that fail too many times. The configuration, following upstream guidance, is a tiny jail.local that overrides only what I want to change:
[DEFAULT]
bantime = 10m
maxretry = 3

[sshd]
enabled = true
mode = aggressive
Three failed auth attempts from an IP and it is banned at the firewall level for ten minutes. Aggressive mode combines the normal, ddos, and extra SSH filters for broader detection.
Optional: On this laptop-based login node, I ran into occasional boot-time issues where
sshdfailed to start before the Ethernet interface was fully configured. I did not capture the exact error at the time, so I cannot confirm the root cause with certainty. The standard fix is a systemd override that makessshdwait fornetwork-online.targetand retry on failure, applied viasystemctl edit sshd.service. If you are building this on desktop or server hardware, you likely do not need this. If yoursshdis in a failed state after reboot, checkjournalctl -u sshd -band apply the override. The exact override is in the repo.
> 5. Why WiFi Is Not the Bottleneck
The most common question about this topology is whether WiFi on the login node bottlenecks the cluster. It does not, because traffic paths are asymmetric.
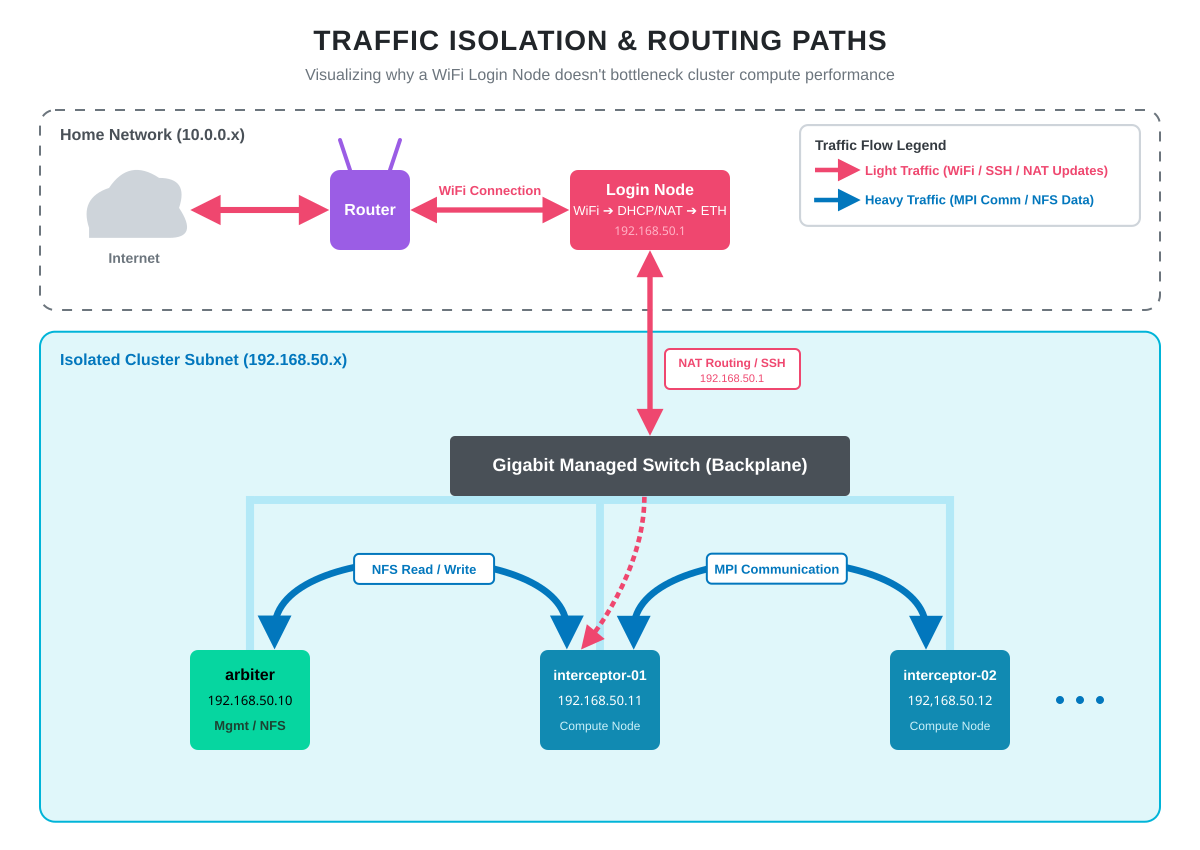
Editing code over SSH, pulling packages from dnf, running git pull, monitoring the system from a browser: all of this goes out over WiFi. None of it is bandwidth-sensitive.
The heavy lifting happens entirely on the gigabit switch. When interceptor-01 reads a dataset from arbiter’s NFS share, that traffic goes node-to-switch-to-node without ever touching the login node. When an MPI job on two workers exchanges messages, same thing. Full gigabit, predictable latency, no WiFi involvement.
Someone streaming video on the home WiFi has zero impact on cluster performance. The login node’s WiFi connection is for management, not for compute.
> 6. What is Next
The cluster is now networked, addressable, and reachable. Every node has an OS. Hostnames resolve. The login node handles DHCP, NAT, and SSH for the internal subnet. From any machine on the home network, I can SSH into carrier and from there into any worker.
In Episode 4, we mount the Samsung 990 Pro on arbiter as a shared NFS filesystem so all nodes see the same home directory tree. After that, Episode 5 brings up FreeIPA for centralized user management, so a user account created once will work across every node in the cluster.
Happy Computing!